|
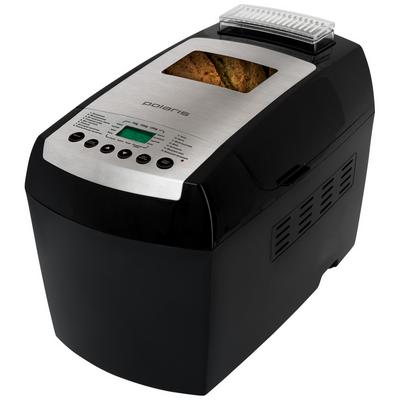
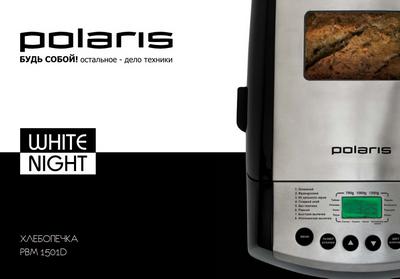
Technical characteristics of bread maker Polaris PBM 1501D
Bowl volume, gr 1250
Bowl coating Non-stick
Number of automatic cooking programs 14
Power, W 860 W
Minimum cooking time 2 hours 27 minutes
Maximum cooking time 3 hours 30 minutes
LED display Yes
Stainless steel case Yes
Manual temperature setting Yes
Additional accessories Yes
Recipe book Yes
Gross weight, kg 9.96 kg
Net weight, kg 7.30 kg
Box dimensions, mm 300 * 685 * 350 mm
Description bread maker Polaris PBM 1501D
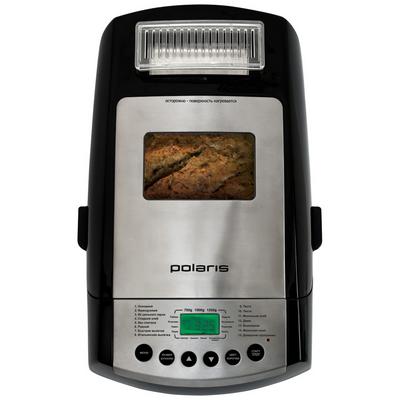
Bread maker Polaris PBM 1501D makes it possible to bake natural bakery products at home. The appliance is equipped with a power of 890 W, which is enough for baking a wide variety of breads: regular, whole grain, French, sweet, rye, Italian, milk and gluten-free bread. In addition, Polaris PBM 1501D can make jam, porridge and knead dough. The baking bowl has a Teflon non-stick coating, to which the dough does not stick or burn.
Bread maker Polaris PBM 1501D (reviews and discussion)
The bread maker is equipped with 14 automatic modes and the Home Program function, which allows you to set the time and temperature manually at all stages of baking. You can cook according to your favorite recipes and save them in the device memory.
The Polaris PBM 1501D bread maker is equipped with a delay timer up to 15 hours and the function of maintaining the temperature for 1 hour. For convenience, the design includes an LCD display. After the set time has elapsed, the bread maker emits a sound signal, indicating the end of baking. Complete with the device, you get a recipe book and potholders as a gift!
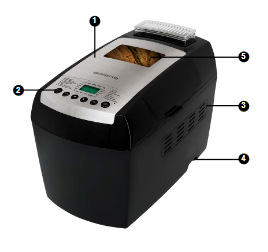
Bread maker device Polaris PBM 1501D
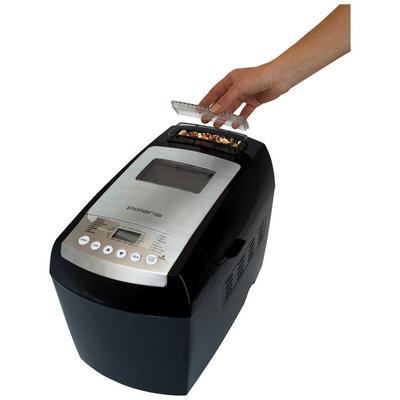
1. Removable cover
2. Control panel
3. Ventilation holes
4. Power cord
5. Window for review
6. Universal blades for kneading dough (2 pcs.)
7. Basic baking dish
8. Measuring glass
9. Measuring spoon
10. Blade extraction hook
11. Additional baking tins - 500
12. Dispenser
13. Paddles for kneading rye dough 2 pcs, used only with the main mold
14. Heat-resistant potholders (2 pcs)

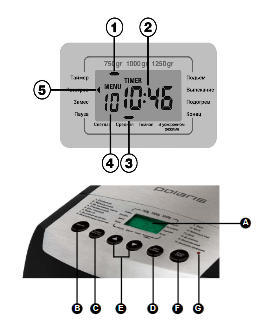
Control panel for bread maker Polaris PBM 1501D
When the device is connected to the mains, a beep will sound and the display LED will turn on.
1. Bread size: 750-1000-1250 gr.
2. Baking time for the selected program.
3. Crust color: light (light brown crust) - in accelerated mode
4. Program selection: 15 different programs.
5. The current stage of the baking process.
A) Liquid crystal display.
B) Menu. Using the "MENU" button you can select one of 15 different programs.
C) The size of the loaf. For programs 1, 2, 3, 4, 5, 6, 7, 8 and 11, you can choose one of three sizes of bread, namely: 750 gr, 1000 gr or 1250 gr. The selected bread size is shown on the LCD along with the corresponding baking time.
D) Peel color. For programs 1, 2, 3, 4, 5, 6, 8 and 11 you can select one of three skin colors, namely light, medium or dark. The selected peel color * is shown on the LCD. In addition, this button can be used to speed up the baking process for programs 1 and 2 using the “SPEED” mode. When you select the "ACCELERATED MODE" mode, the baking time is reduced by 1 hour, by reducing the time of the dough rising process.
This model provides the ability to turn off the sound signals. To turn off the sound signals, press and hold the "crust color" button for a few seconds.
* When baking bread in a bread maker, a crust of the selected color forms on the sides and bottom of the loaf.
Note: You can turn off the beeps only after starting any of the bread maker programs.
E) Delayed start timer. The timer is used to delay the start of the selected program.This function is applicable to programs 1, 2, 3, 4, 5, 6, 7, 8, 9, 11 and 15. By clicking on the sign, you can increase or decrease the time by 10 minutes.
F) Start / Stop. Button to start and stop the program.
G) Signal light. This light turns on red when the bread maker is connected to the mains.
Complete set of bread maker Polaris PBM 1501D
1. Device
2. Basic baking dish
3. Additional tins for baking - 500 gr (2 pcs)
4. Measuring spoon
5. Measuring glass
6. Universal blades for kneading dough (2 pcs)
7. Blades for kneading rye dough (2 pcs)
8. Blade extraction hook
9. Heat-resistant potholders (2 pcs)
10. Power cord
11. List of service centers
12. Recipe book
13. User manual
14. Warranty card
Ingredients for bread maker Polaris PBM 1501D
Flour: Flour is the main ingredient in bread. The flour from which bread is baked must have a high gluten content, which is necessary for raising the dough. Always check the packaging to see if the flour is suitable for baking bread. The weight of different types of flour is very different, so it is very important to weigh the exact amount of flour with a kitchen scale.
Yeast: Yeast is the main and essential product for making bread, thanks to yeast the bread is bulky. We recommend using dry yeast (instant), because this yeast has a longer shelf life and results in better bread baking results.
Salt: Salt enriches the flour and improves the gluten rise in the dough.
Butter / Cooking Oil: Butter / Cooking oil improves the taste of the bread and makes it softer. This ingredient should be at room temperature.
Sugar: Sugar feeds the yeast and therefore plays an important role in the rise of the dough. You can use refined or brown sugar, as well as honey or syrup. Sugar softens the taste of bread, increases its nutritional value and extends its shelf life.
Water: The temperature of the water should be at room temperature: at a lower temperature, the yeast will be less effective, at a higher temperature, the yeast may lose its activity. Warmer water is only recommended if the "Quick Bake" program is selected.
Milk: Milk and various dairy products improve the taste and nutritional value of bread and also contribute to the browning. Subtract the amount of milk from the amount of water specified in the recipe.
TIP: Do not use fresh milk or different dairy products when using the Delay Timer program, as dairy products can turn sour.
Other Ingredients: Some recipes require dry ingredients such as raisins, nuts, sunflower seeds, dried fruit, etc. Before adding dry ingredients, first wash them in water and then dry. Always use fresh ingredients.
TIP: To enhance the flavor of your bread, add ingredients such as eggs, wheat germ, and spices.
Ready dry mix for baking bread (including yeast): Put the ready dry mix in a baking dish and add the required amount of water. Then you should place the baking dish in the bread maker and select program 1 from the menu - Basic, i.e. the basic program for baking bread. Select the weight of the bread according to the mixture content. In dry mixes, it may not be indicated how much yeast is included in the dry mix, so if you are new to homemade bread baking, we recommend that you start with a simple recipe and master it completely.
Ready-made dry bread mix (yeast-free): First put yeast into a bread pan, then dry bread mix, and then add the required amount of water. Select a program according to the mix content and type of flour.
Dough preparation in the Polaris PBM 1501D bread maker
- Make sure that all liquid ingredients are at room temperature (warmer water is only recommended if the "Quick Bake" program is selected).
- Use only dry yeast, as fresh yeast does not always achieve the desired result.
- If you want to use rye flour, then keep in mind that the protein content in rye flour is not enough to form gluten, therefore rye flour bread is less bulky. Rye flour should be diluted with white wheat flour, in proportions of 30% white wheat flour and 70% rye flour.
Important Ingredient Dosing Recommendations
- For successful baking, it is recommended to weigh flour, butter and other ingredients with a kitchen scale. Each recipe lists the dosage of ingredients. If you do not have a kitchen scale, use a measuring cup and a measuring spoon (when measuring ingredients, do not scoop up "with a slide", the level of ingredients should be even "without a slide", because an excess of an ingredient can disturb the proportions of the recipe, you should always remove on top of a measuring cup or measuring spoon.)
- never add too many ingredients:
* For light and regular breads: 500 g dry ingredients + approx. 300 ml liquid.
* For heavy breads: 660 g dry ingredients + approx. 440 ml liquid.
The sequence of adding ingredients
The sequence of adding the ingredients must be observed: first pour water into the baking dish, and then pour the flour so that the flour completely covers the water. When adding salt and yeast, make two small indentations on top of the flour in different corners of the mold, as the yeast should not come into contact with the salt. So, pour salt into the water cavity, and yeast into the other cavity, then level the cavities. You can also add butter and other ingredients (seeds, etc.). in different corners of the shape. Be sure to add sugar, as it contributes significantly to the rise of the dough.
CAUTION: Make sure you have not spilled or spilled ingredients.
CAUTION: To avoid damage to the heating elements, keep the inside of the appliance, all parts and the outside of the bread pan clean, before connecting the appliance, check that the heating elements do not come into contact with ingredients.
WARNING: When loading ingredients, strictly adhere to the proportions given in the recipe.
Operation of the Polaris PBM 1501D bread maker
Remove the bread pan from the appliance.
Fix the kneading paddles to the paddle axles.
Place the ingredients in the baking dish as described in point 4 “Sequence of adding ingredients”. Before placing the baking dish into the appliance, check the outside of the baking dish to make sure it is clean. Place the baking dish into the body of the appliance, check if the baking dish is tightly fastened. Before connecting the appliance, check that the heating elements do not come into contact with the ingredients.
Close the instrument cover. Connect the device to the power supply. After connecting the device to the power supply, a beep will sound, the red indicator light will turn on and the LED indicator of the LCD will turn on.
Now you should choose a program!
Selecting a program in the bread maker
Before installing the program, you must decide whether you will use a large baking dish or two small baking dishes. Note: you cannot bake a cake and bread at the same time, you can bake two breads made from the same recipe, or you can bake two different types of bread that can be baked using the same program. Note: If you decide to bake bread in two small tins, ALWAYS place two small tins together in the appliance for proper temperature distribution inside the appliance during the baking process. The maximum yield of bread by weight bOgr. - from each mold.
Each press of the button is accompanied by a beep.
"Choosing settings"
a. Program: Press and select the "MENU" button, select one of 15 programs.
b. Bread weight: To select the weight (750 gr - 1000 gr - 1250 gr) use the button "LOAD SIZE". At the top of the LCD, there is a sign indicating which weight has been selected. Applies to programs 1,2,3,4,5,6,8 and 11.
c. Peel Color: Press the Peel Color button to select the peel color (light), (medium), (dark) and possibly (fast)). The selection is indicated by a “line” at the bottom of the LCD. Applies to programs 1,2,3,4,5,6,8 and 11
d. Timer (delayed start timer): If you want to suspend the start of the program, ie, start the process after a few hours, press the arrow buttons. The maximum possible installation time is 15 hours. Applies to programs 1, 2, 3, 4, 5, 6, 7, 8, 9, 11 and 15. Press the button consecutively to set the actual time, i.e. the time when the bread should be ready and the baking time according to the selected program, for example: now it is 20:30 minutes, and the bread should be ready at 6:00 in the morning, i.e. (after 9 hours 30 minutes). The selected program number 3 (bread weight 1250 g), it will take 3 hours 48 minutes for baking. Between 8:30 pm and 6:00 am - 9:30 am Subtract 3 hours 48 minutes. from 9 hours 30 minutes, you get 5 hours 42 minutes. Set the timer to 5 hours 45 minutes. using the arrow sign. WARNING: Never use ingredients such as milk, eggs, cheese, etc., in the Timer program (delayed start timer), as these products may spoil or sour.
e. Home program. In this mode, you can set your own settings for the temperature on the rise of the dough and baking and the time at each stage of the bread machine. When selecting mode 15 (Home program), you must hold down the "Start / Stop" button for 2 seconds, then each stage according to the table is sequentially selected by pressing the "MENU" button after setting the time and temperature of the previous stage. Exit from the program settings is carried out by holding the "Start / Stop" button for 2 seconds.
Launching the program in the Polaris PBM 1501D bread maker
- Press the START / STOP button to start the baking process. The timer starts counting down.
- Adding additional ingredients: for programs 1, 2, 3, 4, b and 8 after +/- 20 minutes. A warning signal sounds about loading ingredients, ingredients should be added through the dispenser.
ATTENTION: if you decide to add ingredients during the operation of the device, do not turn off the device, do not press the STOP button, as the baking process will stop.
In the event of a power failure in the memory of the device within 15 minutes. the program phase in which the error occurred during the baking process in the program Delayed start timer is saved. In the event of a power failure after the first mixing phase, the baking process will stop completely, since a good result cannot be achieved in this case.
WARNING: NEVER cover the bread maker with a towel or other materials, do not block the ventilation holes, as steam must escape freely. If the ventilation openings are blocked, the appliance can smoke, as when the dough rises, its shape increases and can touch the heating element. In case of fire, leave the cover closed, immediately press the STOP button and disconnect the appliance from the mains. NEVER simmer dough with water.
End of the baking process in the bread maker
At the end of the baking process, a signal sounds and the display shows 0:00. Almost all programs provide the option "keep warm", this option is automatically activated after the end of the baking process and lasts about an hour.
At the end of the baking process, NEVER leave the baked bread in the appliance for more than 1 hour, as the crunchiness of the crust may deteriorate.One hour after the end of the baking process, a beep will sound every 5 minutes. To remove bread, jam or dough from the appliance, first press the STOP button, unplug the appliance, open the lid, then, using the oven mitts, grasp the baking dish handle firmly, gently pull the baking dish vertically upwards and remove it from the bread machine. Then, extract the content from the form. If you baked bread, place it on a wire rack to cool.
TIP: If necessary, use a wooden spatula to separate the edges of the bread from the sides of the pan. Then turn the pan over and lightly tap the bottom of the pan to remove the bread.
Remove the kneading paddles using the hook. If you could not remove the blades, try to remove them only after the bread has cooled completely. If the kneading paddles are stuck in the baking dish, soak the baking dish in warm water and then unscrew them.
ATTENTION: You can start a new program immediately after the end of the previous one. However, there is a possibility that E01 or E00 will appear on the LCD after pressing the START button. This means that the temperature of the device is still too high (+ 55 ° C). In this case, press the STOP button IMMEDIATELY
unplug the appliance from the power supply, open the lid, remove the baking dish filled with ingredients and let the appliance cool down.
Description of Bread Maker Polaris PBM 1501D Programs
15 PROGRAMS:
1. Basic = Basic program for baking bread.
2. French Bread = Program for baking bread from wheat, protein-rich flour in the French style and yeast white bread with a crispy crust.
3. Whole Grain Bread = Program for making breads with a high content of whole grain flour. This program sets the delay time for the start of baking, because it takes a longer time for the process of swelling of crushed grains, cereals or seeds. Cereal bread is usually less bulky and more dense.
4. Sweet bread = Program for baking sweet bread with a high sugar content, raisins, chocolate, etc.
5. Gluten Free = Special program for baking bread with low gluten flour. Baking gluten-free bread is significantly different from baking conventional breads. If you bake this bread for health reasons, consult your doctor and follow the instructions carefully. For this program, we recommend using ready-made flour mixture "GLUTEN-FREE". There are low gluten mixes and gluten free mixes. Check with your doctor which one is best for you. Bread should be stored in a cool and dry place. Gluten-free bread should be consumed within 2 (two) days. If bread needs to be stored for a longer time, it can be frozen in the freezer. We are not liable for harm resulting from the use of ingredients for which permission has not been obtained from a doctor, as well as harm resulting from non-compliance with instructions, recipes, shelf life, etc.
6. Rye = Program for baking bread with a high rye content. This program sets the delay start time, because it takes a longer time for the process of swelling of the crushed rye grains. Rye bread is usually less bulky and denser.
7. Quick baking = Fast baking program. This program shortens the baking time by 1 hour and 20 minutes, by reducing the holding time and raising the dough. This type of bread is usually less bulky and denser.
8. Italian pastries = Program for making light Italian-style bread, predominantly with olive oil and spices (such as oregano, thyme).
9. Dough = Program for making yeast dough and dough for cakes and pizza. The program provides for kneading the dough, then settling the dough to rise it, without baking.After the kneading process, flour products can be baked from this dough in a conventional oven.
10. Pasta = Program for making dough without rising and baking for pasta, waffles, biscuits, pies, etc. The dough is just kneaded.
11. Milk bread = Program for baking bread with milk or dairy products.
12. Jam = Program for processing fresh fruits and preparing products such as apple mousse, jam, etc. The indicated quantities must not be exceeded as the jam must be boiled in a baking dish until cooked.
13. Baking = Program for baking only. It can also be used to cook under-baked bread or to bake raw dough. This program can be used sequentially several times in a row.
14. Milk porridge = The program allows you to cook your favorite milk porridge from any kind of cereal. This bread maker has added the ability to prepare from 2 to 6 measuring cups of the product in the Milk porridge mode. When mode 14 (Milk porridge) is selected, by switching using the "Loaf size" button, you can select the amount of porridge to be prepared (according to the volume of water used). Loaf size value 750 g
correspond to 2 measuring glasses of water, 1000 g - 4 glasses, 1250 g - 6 glasses of water. The default cooking time for these modes is 40 minutes for 2 glasses, 50 minutes for 4 glasses and 60 minutes for 6 glasses. In this case, the working temperature of cooking is from 90 to 100 degrees. For different variants of ingredients used, the cooking time can be adjusted from 20 minutes to 1 hour 30 minutes in all 3 modes.
15. Home Program - A program for your own recipes.
Maintenance and cleaning of the bread maker
- Disconnect the appliance from the power supply and let it cool down before cleaning.
- Wipe the inside and outside of the device with a damp cloth and wipe dry. NEVER immerse the device in water or any other liquid.
- Wash the kneading paddles and baking dish in warm water with the addition of detergent. DO NOT use abrasive products to avoid damaging the non-stick coating. The baking dish, dough paddles, measuring spoon and measuring cup are dishwasher safe.
- NEVER use metal brushes, aggressive cleaning agents or liquids such as alcohol, gasoline, acetone, etc. for cleaning the device and its parts.
- Before reconnecting the appliance to the mains, make sure that the appliance is completely dry.
- Store the device in a clean, dry place out of the reach of children. Do not place heavy objects on top of the device.
|


