|
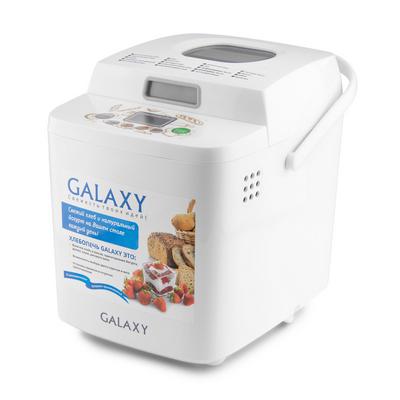
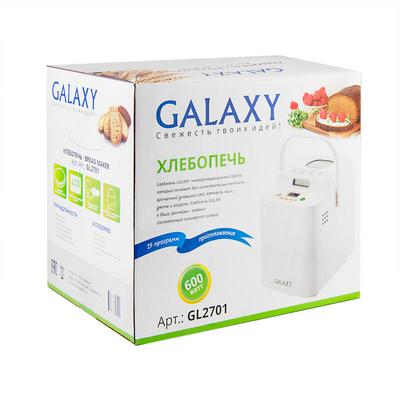
Galaxy GL2701 Bread Maker Specifications
Power, W: 600
LCD: Yes
Rubberized feet: Yes
Timer: Yes
Number of programs: 19
Carrying handle: Yes
Electronic control panel: Yes
Baking weight, g: 500 and 750
Delayed start: Yes
Preheating bread for 60 minutes after cooking: Yes
Saving the set program with a short power outage: Yes
Large viewing window: Yes
Non-stick container and kneading paddle: Yes
3 degrees of browning: Yes
Overall dimensions, cm: 35x25x32
Gross weight, kg: 3.3
Warranty period: 1 year
Power parameters, V / Hz: 220-240 / 50
Description of the Galaxy GL2701 bread maker
In GALAXY bread makers you can easily bake any type of bread, while independently choosing the degree of crispness of the crust that suits you and the weight of the finished baked goods. The "Delayed start" function will help in the morning to wake up loved ones with the pleasant aroma of a freshly baked bun, because after loading the ingredients in the evening and setting the required time for the start of cooking, you will receive ready-made bread at the desired time. In addition, in the GALAXY bread makers you can easily prepare aromatic fruit and berry jams and preserves!
With the help of the colorful recipe book and the GALAXY bread maker, you will discover new culinary talents and get a lot of positive emotions from the cooking process! Cook with GALAXY, cook with pleasure!
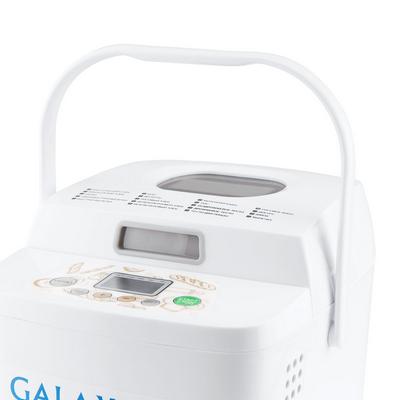
Galaxy GL2701 Bread Maker
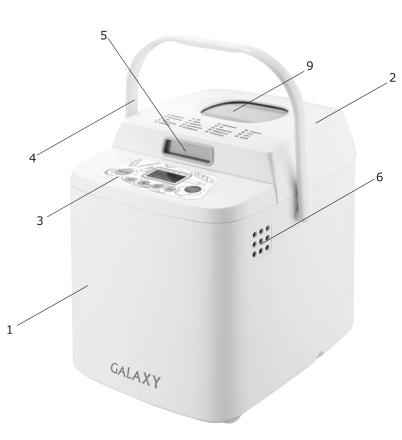
1. Case
2. Cover
3. Control panel
4. Carrying handle
5. Handle for opening the lid
6. Ventilation holes
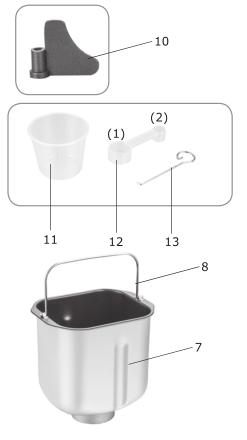
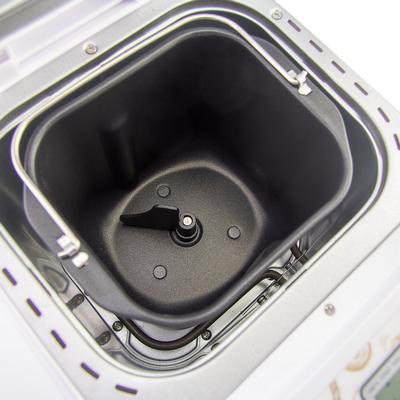
7. Baking container
8. Baking container handle
9. Viewing window
10. Kneading paddle
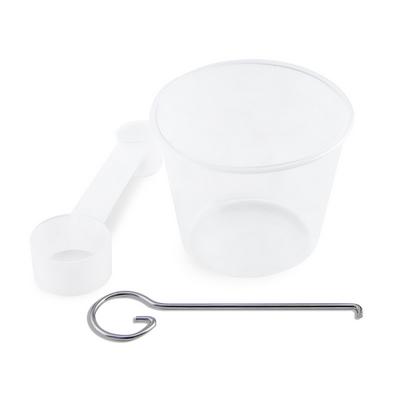
11. Measuring cup
12. Dispensing spoon:
(1) tablespoon (tbsp) (2) teaspoon (teaspoon)
13. Hook for removing the kneading paddle
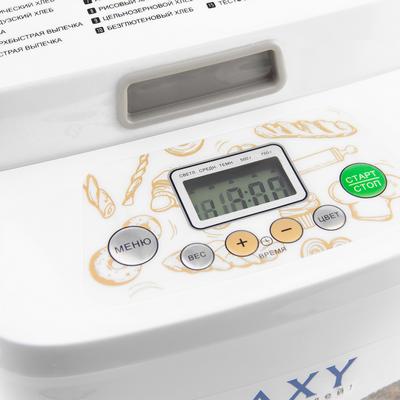
Galaxy GL2701 Bread Maker Control Panel
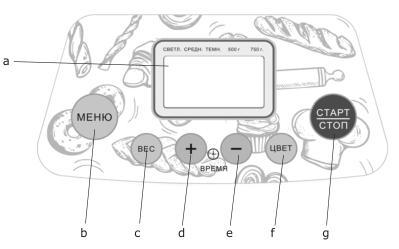
a) Display
b) Button for selecting the baking program "MENU"
c) Weight setting button "WEIGHT" (500/750 g)
d) Button for increasing the delay time (cooking time) "+"
e) Button to decrease the delay time (cooking time) "-"
f) Button for selection of crust color "COLOR" (light / medium / dark)
g) ON / OFF button "START / STOP"
Before first use
Carefully remove the product and its accessories from the box. Remove all packing materials.
Be sure to keep the warning decals, directional decals (if any) in place.
Wipe the body of the bread maker with a damp cloth. Remove the container from the appliance as follows: remove the kneading paddle from the shaft, slide the baking container slightly counterclockwise on the shaft and pull it towards you using the handle. Wash the baking dish and kneading paddle with warm soapy water. Dry the appliance and its parts.
Before turning on, make sure that the internal and external parts of the device are not damaged, chipped or other defects. Place the device on a firm, level horizontal surface, away from heat sources, places where water, hot grease and other contaminants may get on the device. During installation, make sure that there are no decorative coverings, electronic devices and other objects nearby that may be affected by high temperatures. Do not place the breadmaker close to the edge of the table or close to walls or other appliances. When placing under hanging furniture, make sure there is enough space to open the lid.
Before baking bread, you must turn on the bread maker for 10 minutes with an empty container, then let it cool, remove the container and rinse again.
ATTENTION! During the first start-up, a characteristic odor or light smoke may appear from the combustion of technical lubricants used to preserve the finished product. This is not a manufacturing defect.
Electrical appliance operation
Saving the set settings in case of short-term power outage
In the event of a power outage while a cooking program is running, the settings are saved in the device memory for 10 minutes. When the power supply is restored, the program will automatically resume.
If there is no power supply for more than 10 minutes, the settings are reset. When reconnected to the mains, the device goes into standby mode.
If perishable food was used in the recipe, unplug the appliance and let it cool down. Remove the baking dish, clean it and start over with fresh ingredients. When cleaning, strictly follow the instructions in the Storage and Maintenance section.
If the ingredients used were not perishable, you can restart the cooking program (if the baking process has not started). Check the readiness of the product through the inspection window, if necessary, interrupt the program with the "START / STOP" button.
Please note that if the program is restarted, the quality of the baked bread may not be as desired.
Maintaining the temperature of ready meals
The function "Maintain the temperature of ready meals" turns on automatically at the end of the program and can maintain the temperature of the ready meal for up to 1 hour. The display will show 0:00.
The heating prevents moisture absorption and helps keep the garment soft for some time. However, for best results, it is recommended to remove the bread immediately after the end of the cooking process.
If necessary, heating can be turned off by pressing and holding the "Start / Stop" button for a few seconds.
The heating function is not available with programs 7, 11-19.
General procedure for using automatic programs.
1. Place the dough paddle on the rod in the baking container. Make sure the connection is tight. Lubricate the container and paddle with oil.
2. Measure out the required ingredients according to the selected recipe and place them in the container. When baking bread and making dough: Prepare the main and additional ingredients (fruits, nuts, raisins, etc.) according to the recipe. All foods should be at room temperature (25-35 ° C) unless otherwise specified in the recipe. Place the main ingredients in a baking container in the sequence shown in the recipe.
3. Carefully insert the baking container into the heating chamber of the breadmaker. The mold should connect to the drive shaft evenly, without distortions. Lock the container by turning it clockwise until it stops. Close the cover with the viewing window.
ATTENTION! First place liquid ingredients (water, milk) and / or eggs in the mold. The water should be at room temperature, as too high a water temperature will adversely affect the rise of the dough. When using the delayed cooking mode, use only milk powder, otherwise the milk may curdle before cooking.
Add yeast or baking powder last. These components must not come into contact with liquids, otherwise fermentation will start too early: the result is tough, hard and coarse bread. The yeast should not come into contact with salt. It is recommended to make a hole in the flour pile and place yeast or baking powder in it.
4. Connect the breadmaker to the mains. The appliance will beep and go into standby mode: the display will show the program number (by default - 1) and the time of its operation.
5. Using the "Menu" button select a cooking program, its number will appear on the display.
6. Use the "Weight" button to set the weight value for the finished product. The default is “750g”. Follow the directions in the recipes and the amount of ingredients in the container. The baking weight indicator will move at the top of the display. The choice of product weight is provided only in programs 1-3, 5, 8-10.
To select the desired color of the product crust (light, medium, dark), press the "Color" button. The crust color indicator will move at the top of the display. The default is Medium. The choice of crust color is only available in programs 1-3, 5, 6, 8-10.
7. If necessary, change the cooking time or set the delayed cooking time.
In the case of using a program with the ability to manually adjust the cooking time, the first press of the "Start / Stop" button after setting the time value will confirm the entered values. Pressing the “Start / Stop” button again will start the program.
8. Press the "Start / Stop" button. The timer starts counting down the cooking time.
9. During the first 5 minutes of mixing, pay attention to the appearance of the dough. It should make a round, even lump. If a lump does not form, the ingredients are not mixed correctly.
In order to temporarily stop the execution of the program without resetting the settings, press the “Start / Stop” button once. The time will flash on the display. To continue the program, press the “Start / Stop” button again.
The lid of the bread maker can only be opened during kneading (you can hear the sound of a running motor). Opening the lid during dough rising or baking will reduce the quality of the finished product.
10. Adding ingredients
You can sprinkle the bread with seeds, nuts or small pieces of fruit, or add additional ingredients to your dough. Adding ingredients is available for programs 1-3, 5, 6, 8-10.
The possibility of adding ingredients is indicated by a sound signal during the program operation. Open the cover carefully using the handle. Add ingredients, close the lid tightly.
11. The end of the cooking program will be indicated by an acoustic signal. After that, depending on the selected program, the appliance will go into heating mode or standby mode.
12. To interrupt a program or heating mode, press and hold the Start / Stop button.
13. When finished, disconnect the breadmaker from the power supply.
Setting the cooking time
In the bread maker, you can independently set the cooking time for programs 7, 11, 15-19. To change the cooking time after selecting a program, press the "+" and "-" buttons. The increment and possible range of cooking times depend on the selected program. Press and hold the desired button to quickly change the time. Upon reaching the maximum (minimum) value, the time setting will continue from the beginning (from the end) of the range.
Delaying the cooking time of the program
The "Delay cooking time" function allows you to set the time interval at the end of which the bread must be ready (taking into account the program run time). You can set the time in the range from 10 minutes to 15 hours in 10-minute increments.
This function is available in programs 1-6, 8-10, 12-14.
To change the delayed cooking time, after selecting the automatic program, weight and color, press the "+" and "-" buttons. Press and hold the desired button to quickly change the value. When the maximum (minimum) value is reached, the time setting will continue from the beginning (end) of the range.
Note that when setting a cooking delay time, the same buttons are used as when setting a cooking time.
Purpose and features of automatic cooking programs
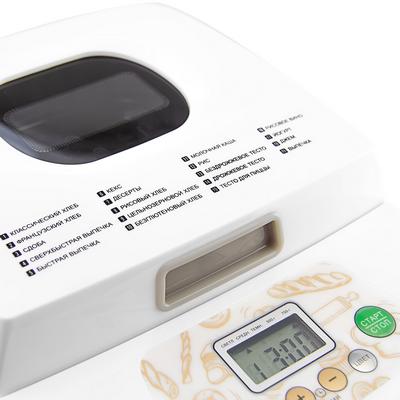
1. Program "CLASSIC BREAD"
Used to bake classic white bread. The program includes kneading, proving the dough and baking bread. You can choose the weight of the product and the color of the crust. In this program, it is possible to add additional ingredients, which will be indicated by a sound signal. There is no manual time adjustment.
2. Program "FRENCH BREAD"
Used to bake light French bread with a crispy crust. Provides a long kneading and proofing of the dough. The program includes kneading, proving the dough and baking bread. In this program, it is possible to add additional ingredients, which will be indicated by a sound signal. There is no manual time adjustment.
3. Program "SDOBA"
Recommended for baking muffins. The program includes kneading, proofing and baking. In this program, it is possible to add additional ingredients, which will be indicated by a sound signal. There is no manual time adjustment.
4. "SUPER FAST BAKING" program
Used for quick baking of white bread. The program includes kneading, proofing and baking. There is no manual time adjustment.
5. FAST BAKING program
Used for quick baking of white bread. The program includes heated kneading, proofing and baking. In this program, it is possible to add additional ingredients, which will be indicated by a sound signal. There is no manual time adjustment.
ATTENTION! Selecting the "SUPER FAST BAKING" and "FAST BAKING" programs, pour water at a temperature of 40-50 ° C into the baking container (measure the water temperature with a kitchen thermometer). The water temperature plays an important role in the preparation of bread in these programs: too low a temperature will not allow the dough to rise on time, and too high will kill the yeast.
6. Program "KEKS"
Recommended for baking muffins with various fillings. The program includes quick kneading, proofing and baking. You can choose the color of the product crust. Product weight selection is not available. In this program, it is possible to add additional ingredients, which will be indicated by a sound signal. There is no manual time adjustment.
7. Program "DESSERTS"
Recommended for preparing various desserts. The cooking time can be adjusted in the range from 20 minutes to 2 hours with a setting step of 5 minutes. The default cooking time is 1 hour and 20 minutes. The choice of product weight and crust color is not available.
8. "RICE BREAD" program
Recommended for making rice bread. The program includes kneading, proving the dough and baking bread. You can choose the weight of the product and the color of the crust. In this program, it is possible to add additional ingredients, which will be indicated by a sound signal. There is no manual time adjustment.
9. The "WHOLE GRAIN BREAD" program
The program includes kneading, proving the dough and baking bread. You can choose the weight of the product and the color of the crust. In this program, it is possible to add additional ingredients, which will be indicated by a sound signal. There is no manual time adjustment.
10. "GLUTEN-FREE BREAD" program
For baking gluten-free bread. The program includes heating the ingredients, kneading, proving the dough and baking bread. You can choose the weight of the product and the color of the crust. In this program, it is possible to add additional ingredients, which will be indicated by a sound signal. There is no manual time adjustment.
11. Program "MILK Porridge"
Program for boiling porridge with milk and water. The time can be adjusted in the range from 20 minutes to 1 hour 50 minutes. The default cooking time is 40 minutes.
12. RIS program
Program for cooking rice until tender, stirring. You can add minced meat or any other ingredients to taste to the finished rice, form balls, fry or stew in a pan and serve as a side dish.
There is no manual time adjustment.
13. The program "THERAPY Dough"
Program for kneading and proving yeast-free dough without further baking. There is no manual time adjustment.
14. "YEAST Dough" program
Program for kneading dough without further baking. There is no manual time adjustment.
15. Pizza dough program
Recommended for kneading pizza dough without proofing or baking. The time can be adjusted in the range from 8 minutes to 45 minutes in 1 minute increments. The default cooking time is 8 minutes.
16. "RICE WINE" program
The program is designed for making rice wine. The time can be adjusted in the range from 24 to 72 hours in 1 hour increments. The default cooking time is 48 hours.
Cooking rice wine:
1. Rinse the rice and soak it in 1.5 liter clean water for 16 hours.
2. Check fig. If it crumbles easily in your hand, drain the water, rinse the rice with clean water and let the water drain.
3. Steam the rice until half cooked and then chill to 35 ° C.
4. Add wine yeast, cold water to rice and stir.
5. Place the rice in a container, press down with a spoon and flatten.
6. Select the "Rice Wine" program.
7. Press the Start / Stop button.
8. When the cooking time has elapsed, a signal will sound. Remove the container from the device.
9. Strain the wine and refrigerate. It is not recommended to store wine for more than 2 weeks.
10. Rice wine can be used both as wine and as an ingredient in various sauces.
17. Program "YOGURT"
Program for preparing various types of yoghurt. The cooking time can be adjusted in the range from 5 minutes to 12 hours with a setting step of 5 minutes. The default cooking time is 8 hours.
17. Program "YOGURT"
Program for preparing various types of yoghurt. The cooking time can be adjusted in the range from 5 minutes to 12 hours with a setting step of 5 minutes. The default cooking time is 8 hours.
For yoghurt you can use yoghurt starter culture or live yoghurt.
1. Sterilize the container in which the yoghurt will be prepared (plastic container or glass cups).
2. Heat milk to 80-90 ° C, but do not bring to a boil. Then let it cool to room temperature.
3. Mix until smooth, 600 ml of milk with crushed yoghurt starter or 60 ml of "live" yoghurt. To determine the amount of starter needed to make yoghurt, follow the instructions supplied with the starter.
4. Pour the yoghurt mass into prepared containers; do not cover them with lids.
5. Place the containers in the bread maker and close the lid.
6. Select the Yogurt program and start it.
7. After the cooking time has elapsed, remove the containers with yoghurt from the electrical appliance, cover them with lids and place in the refrigerator for 2-3 hours until the yoghurt mass thickens.
8. If desired, sugar, pieces of fruit, berries, jam, cereals, etc. can be added to yogurt before use.
9. The finished yoghurt can then be used as a starter culture up to 10 times. In this case, the cooking time for the next batch will be 6-7 hours.
18. Program "JAM" ("JAM")
It is used for making preserves, jams, toppings for baked goods, waffles and ice cream, ketchup, all kinds of spices. The cooking time can be adjusted in the range from 5 minutes to 1 hour and 20 minutes with a setting step of 5 minutes. The default cooking time is 40 minutes.
ATTENTION! Using an excessive amount of ingredients can cause the food to overflow and burn.
After making the jam (preserves), immediately transfer it to another container and wash the container.
19. Program "BAKING"
The program is recommended for baking biscuits and other pastry products, as well as for finishing unbaked products. There are no kneading and proofing stages in this program. It is possible to manually adjust the time in the range from 20 minutes to 2 hours with a setting step of 5 minutes. The default cooking time is 1 hour.
Adjust the required temperature for baking using the "COLOR" button, where
"Light" - 160 ° С, "Average" - 180 ° С, "Dark" - 200 ° С.

Extracting finished bread
1. Open the cover of the instrument. Using oven mitts, grasp the baking container by the handle and turn it counterclockwise, then remove it from the heating chamber.
ATTENTION! Remember that at the end of the cooking process, the bread, container and heating chamber are very hot! Be careful, use oven mitts to avoid scalding! Do not place a hot container of bread on a tablecloth, plastic or other heat-sensitive surfaces that could catch fire or melt!
2. Turn the baking container upside down and remove the baked bread from the baking dish and place on a wire rack or dish. Let the bread cool for 20 minutes.
3. After the baking container and appliance have cooled down, clean them according to the Storage and Maintenance section.
The design of the bakery provides that after removing the baked goods from the container, the kneading paddle must remain on the shaft inside the mold. If this does not happen and it remains in the bread, this is not a defect. Remove the blade using the supplied hook.
Slicing and storing bread.
Use an electric or special serrated knife to cut the bread.
Store bread in sealed packaging (in an airtight plastic bag or plastic container) at room temperature for no more than 3 days. For long-term storage (up to 1 month), place the bread in a sealed container in the freezer. Since homemade bread does not contain preservatives, it can dry out and spoil faster than industrially prepared bread.
ATTENTION! In order for the bread to meet expectations, the recipe must be followed closely. Pay attention to the expiration date and proper storage of the ingredients you use. Do not open the lid of the bread maker unless prescribed by the recipe. If the dough sticks too much to the sides of the container, dust the sides with flour. If the dough is too dry, add a tablespoon of warm water. Use a wooden or plastic spoon to remove any ingredients stuck to the sides of the container. Do not use metal objects for this - they can damage the non-stick coating of the mold.
Ingredients
ATTENTION! The manufacturer of this bread maker is not responsible for the quality of the baking ingredients you use!
The selection of ingredients is a very important step when baking bread. In order to get tasty and healthy bread, you need to use only the best ingredients.
Wheat flour
For white flour bread, it is best to use a high protein flour such as premium wheat flour. Do not use pastry flour, baking flour, or flour with artificial leavening agents for classic bread (program 1).
Wheat flour of the highest grade - white, soft, is produced from grain that has undergone special training to preserve nutrients, vitamins and trace elements.
Wheat flour of the highest grade is better stored and has excellent baking qualities - excellent white bread and baked goods are obtained.
Unlike wheat flour, wholemeal flour contains wheat germ and bran, and as a result, dough made from such flour does not rise well. Bread made with whole flour is denser and smaller in size. If you want a fuller and fuller whole-flour bread, it is recommended to use a mixture of premium white flour and whole flour.
Rye flour
You can make good quality bread from rye flour. Bread made from rye flour has a smaller volume, it is darker than white bread.This type of bread is usually less porous and airy than wheat bread, so a mixture of wheat and rye flour is recommended.
Whole flour
Whole flour (whole grain flour, wholemeal flour, wholemeal flour) contains bran that makes the texture of the bread coarser. Bread made from coarse flour is denser because the bran contained in such flour prevents the dough from rising. Therefore, baking bread with whole flour requires a special program that is longer than the program for baking classic bread.
Bread with bran is a very healthy and tasty product, as the bran absorbs harmful substances that enter the body with food, absorb allergens, reduce the level of "harmful" cholesterol and strengthen the immune system. In addition, bran bread is prized primarily for its relatively high protein content. It contains a lot of dietary fiber, as well as potassium, phosphorus and iron, vitamin B1 and PP. It is high in fiber and magnesium, which contributes to good digestion.
Corn flour and oatmeal are produced by grinding corn and oat grains and added as ingredients in the baking of diet bread to improve the flavor and texture of the product.
Yeast
When preparing dough, during fermentation, the yeast converts the sugar contained in the dough into carbon dioxide. Due to the release of carbon dioxide, the dough rises, and the bread is airy and fluffy. In order for the dough to rise well, it is very important to observe the correct temperature regime: if the temperature is low, then the dough will rise poorly, but if the temperature is too high, then the yeast will lose its properties.
For best results, fast acting dry yeast is recommended. Remember, when loading ingredients, the yeast must not come into contact with the liquid. The ingredients must be added in the order they appear in the recipe. Always put yeast last. After opening the package, store the yeast in the refrigerator and use it as soon as possible. Before use, yeast that has been stored in the refrigerator must be brought to room temperature, as chilled yeast has low activity.
Salt
Salt is used to raise the dough and give the bread the desired flavor. Salt strengthens the structure of the bread, makes the dough more elastic and prevents it from sinking during the rise. It is recommended to use fine table salt. When adding salt to the dough, measure its amount very carefully, since excess salt inhibits the fermentation process and prevents the dough from rising.
Oil and fats
Oil and / or fats are added to the dough to soften it and keep the bread fresh for longer. Butter is also needed to improve the quality of the bread, as oil helps to retain moisture in the bread. If you are using butter to enhance the taste of your bread, it is recommended to use butter. You can also use margarine or olive oil instead of butter.
Sugar and sugar substitutes
Sugar and sugar substitutes are used in bakery for the following purposes:
- to give the bread the desired taste and aroma;
- to give the bread a golden crust, softness and delicate texture;
- so that the bread stays fresh longer and does not dry out, as sugar helps to absorb and retain moisture;
- in addition, sugar is necessary for the dough to rise well, since sugar is a nutrient medium for yeast cultures.
As substitutes for sugar, you can use: brown sugar, molasses, maple or corn syrup, honey. If you are using liquid sweeteners, the amount of liquid in the recipe should be reduced, and the amount of liquid you reduce should be the same as the amount of liquid sweetener.
ATTENTION! Do not use artificial sweeteners or sugarless sweeteners!
Liquids
The dough is usually prepared using water and / or milk. It is recommended to use water or milk at room temperature when preparing bread in the bread maker. When using milk, the bread is richer and softer than when using water. When adding liquid to the dough, you need to very accurately measure the required amount of liquid. If you add more liquid than indicated in the recipe, the dough will fall off during baking; if less, the dough will not rise. If you're using raw eggs in your recipe, reduce the amount of liquid ingredients.
Baking powder is used to make breads and cakes very quickly. Baking powder makes the product airy and soft, while the dough does not require time to proof. As a baking powder, soda is used (to enhance the effect - with citric or acetic acid), food additives or special mixtures.
Eggs improve the flavor and color of the bread, making it softer.
ATTENTION! Do not add fresh milk to the dough if you are using the delay function. In this case, it is necessary to replace fresh milk with milk powder diluted with water.
Other ingredients
When baking bread, you can also add ingredients such as nuts, fruits, raisins, etc. to the dough. These ingredients must be added after the first kneading is completed. When the first kneading cycle is completed, a beep will sound - this means that you can add additional ingredients to the dough. The cooking process then continues and ends as usual. It is not recommended to add additional ingredients at the beginning of the bread making cycle, along with the main ingredients.
ATTENTION! If you are using the Delay Cooking function, do not put perishable food (such as eggs, milk, fresh vegetables and fruits, etc.) in the bread machine, as these ingredients may spoil.
Features of dosage and bookmarks of ingredients
It is necessary to strictly observe the proportions and strictly follow the recipe.
Use the supplied measuring cup and spoon.
Fill the measuring cup with liquid to the appropriate mark. Check the dosage by placing the glass on a level surface. Clean the beaker thoroughly before measuring another type of liquid.
Do not condense dry ingredients by pouring them into the dosing spoon.
When using recipes from cookbooks for other bread makers, target the weight of the finished bread to 500 or 750 grams. Do not fill the working container by more than a quarter or, in extreme cases, not more than a third of its volume. Otherwise, during lifting, the dough may overflow over the edges of the mold into the heating chamber, fall on the heating element and clog the drive, which, in turn, will damage the appliance.
Recommended sequence for placing ingredients (unless otherwise indicated in the recipe): liquids (water, milk, butter, beaten eggs, etc.) are poured into the bottom of the baking dish, then dry ingredients are added, dry yeast is added last.
Make sure that the flour is not completely wet, put the yeast only on dry flour. The yeast should also not come into contact with the salt, as the latter reduces the activity of the yeast. It is important to sift the flour before measuring in order to saturate it with air, this will guarantee the best baking result. Remove the slide with a knife.
ATTENTION! The cooking result directly depends on the quality of the ingredients used, pay attention to the shelf life!
External conditions
External factors such as temperature, humidity, etc. can affect the baking result. The optimum room temperature for baking pastries in a bread machine is 20-24 ° C.
It is not recommended to place the device in a draft or in a room with high humidity.
Slicing and storing bread
- After you have removed the finished bread from the bread maker, let it cool for 30 minutes. Do not slice hot bread immediately after cooking.
- Homemade bread does not contain preservatives, so it should be consumed within 2-3 days.
- For longer storage, place the bread in a clean plastic bag or wrap it in foil and store in the refrigerator. The maximum shelf life of bread in the refrigerator is 5-7 days. Allow bread to cool completely before storing it in the refrigerator.
|


